Pebble Time review
After selling my last smartwatch the Moto 360, I was without a smartwatch for a while. I thought I could live without a smartwatch but somehow I got this empty feeling in my soul. Every time I get a notification on my phone, I kept glancing at my wrist expecting to see them there but alas I only got a regular digital watch on. The thought of taking out my phone to actually see them new messages feels like too much of a bother for me. I know it sounds rather lame but that’s how you feel after using a smartwatch for a while.
So I went again into the market looking for that perfect fit smartwatch. The perfect smartwatch for me at the moment would still be the Moto 360 but with a thinner design, no black flat tyre at the bottom and extra long battery life. The next best thing would be the Apple watch because it’s Apple. It’ll work seamlessly with my iPhone but I can’t bring myself to spend upwards of 1,000 ringgit for one. Hence that leaves me with the grand daddy of smartwatches - Pebble.
As always I made an extensive research on the Pebble smartwatch before deciding to purchase it. One thing for sure it has none of the flash and dazzle of an Android Wear but for it’s low price point (lower than the cheapest Android Wear at least), the Pebble smartwatch offers everything you need and expect of a smartwatch. Now there are 5 types of Pebble watches in the market, the cheapest one is the Pebble Classic and the slightly newer one is the Pebble Time which is the one I finally bought. The Classic is too clunky and cheap-ish looking in my opinion and while I’m tempted to get the Time Round, it is a tad too expensive for my budget and I think the bezel is too thick for my liking. So Pebble Time it is.
Since there is no local distributors for the Pebble brand, you have to either buy it direct from the Pebble website or a third party reseller like Lazada et al. As usual since it’s shipped from overseas, expect a few weeks for it to arrive to your doorstep. Yes you can opt for the in stock local shipment but prepared to pay at least 200 ringgit more for the convenience. The one that I got cost RM629 from Lazada which is roughly the same price as the Pebble website but was currently out of stock at that time. If you’re on a tight budget, you can always look for one on online marketplace websites like Mudah.my for around 500 ringgit.
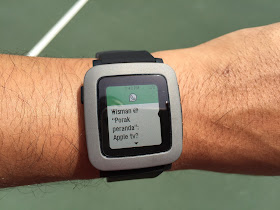
So how does it fare? First impressions - I love the minimalist design, the lightweight and also the simplistic user interface. The Pebble Time uses an always on 64 color epaper technology on its screen unlike the LCD or TFT screen of the regular Android Wear watches. One benefit of this screen that it uses a lot less battery hence why the Pebble Time’s battery is advertised to last up to a week. The screen looks great and clear under sunlight but in darker places you will have trouble reading the screen unless you adjust the angle of the watch to reflect sunlight or a light source. But isn’t there a backlight display on this watch? Of course it has but the display doesn’t easily lit up and you need considerable force (if you’re not careful you might hurt your arm) in twisting your arm to turn on the backlight. The other way to turn on the light is of course by pressing any one of the 4 buttons on the watch.
The Pebble Time uses Gorilla Glass screen which is supposed to be tough and on par with smartphones but I would still advise you to use a screen protector of some sort. Especially to retain the resale value in case you’re planning to sell it off some day. The screen protector is virtually non-existent in local gadget or watches stores and I had to order them online and wait 20 days for the overseas delivery to arrive.
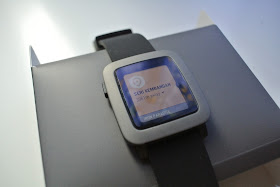
There’s 4 physical button on the watch, the single back button on the left side and the 3 up, select and down button on the right side. The back button as the name suggests brings back the interface to the previous screen and ultimately to the watchface. Pressing the up button displays your footsteps and sleeping pattern for the entire week. Pressing the down button shows your calendar appointments apart from the default sunrise and sunset times. Finally, pressing the middle select button will show you the default apps like music, timer, stopwatch, weather and also other installed apps. You also access the settings, change the watchfaces or see old notifications from the middle button. If you came from Android Wear or WatchOS, it would feel a bit weird using the physical buttons on the Pebble but you’ll get used to it over time. The buttons are big and easy to press and after some time you’ll learn to appreciate navigating the watch’s interface with them.
Now how do you connect your Pebble watch to your phone? Pebble smartwatches is the first watch to support both Android and iOS since launch and although the iOS app doesn’t offer the full functionality of the Android app, it is good enough for my day to day use. For example you can send and reply text messages on Android instead of just reading them on iOS. You can make calls straight from your Pebble on Android. You can also interact with the hardware on Android, to do things like toggle wifi/bluetooth, mute mic, turn on speakerphone, and so on but not on iOS because of its closed ecosystem. So yeah if you’re using the Pebble exclusively with iOS there’s a lot of neat features that you’ll be missing (see the list here) but for a hardcore Apple fan like me, it doesn’t bother me that much for as long as I can get many of the core Pebble features on my iPhone working 😀.
As the pioneer of the smartwatch, the Pebble Appstore features a good variety of apps and watchfaces comparable to those on Android and iOS. There’s health fitness apps, games, companion apps to popular Android and iOS apps like ESPN, Pandora, RunKeeper, Uber and Foursquare just to name a few. To be honest I don’t have much of those apps installed on my Pebble cause I don’t see much use for them when I already have them installed on my phone. And the games, while they’re quite a number to choose from, trying to play Tiny Bird or Tetris on the Pebble is a pain in the ass (or finger) to put it mildly. In fact I don’t fancy playing games on any smartwatch be it Android Wear and especially Pebble because of the horrible user interface experience. Another thing, you can actually type from the watch but you’ll have to press the buttons up and down a hundred times to select the letters, it’s horrible. Reminds you how you the days before touch screen smartphones where you have to type a dozen numbers for a single letter? Yeah it’s those glory days all over again so I don’t know why anybody would want to do that.
Now on to the list of things I like and don’t like about the Pebble Time. I like how the watch gives me a soft but subtle vibration for all incoming notifications. It’s not too intrusive or strong, more like a little nudge to alert you of new messages etc. I like the variety and quality of the watchfaces created for Pebble. Sure they’re not HD or colourful as on the Android Wear but many of them are quite pleasant to watch and use. I love the retro square look of the watch. The screen size is not too big and fit just right on my wrist. I especially love the overall thinness of the watch, definitely thinner than the Samsung Gear and Moto 360 and definitely feel much more lighter than most Android Wear watches in the market. For once it feels like I’m wearing a normal wristwatch instead of a small (but heavy) computer on my wrist. Lastly I love the silicone strap that comes standard with the watch. It is easily detachable with a tiny lever and you can simply find another band of different colour or even steel and leather ones online. Other than that I also love the magnetic charging cable which connects easily to the Pebble.
What I don’t like about the Pebble Time. Although this Pebble offers a lot of watchfaces to choose from, I kinda miss the high definition looking watchfaces from Android Wear. Of course that HD look comes at the expense of short battery life, but my very own Pebble Time doesn’t last more than 4 days albeit with heavy use and notifications. So yeah 4 days is a lot longer than the average 8–10 hours I get on Android Wear but that comes from sacrificing HD display. Talking about battery life, when I first got the Time, it rarely got past 3 days (sometimes 2) from heavy use which is kinda frustrating since the advertised battery life is 7 days. However after following the troubleshooting tips from Pebble Support and updating the software to the latest version, it managed to last around 4 days currently.
So in a nutshell, if you’re looking for a flashy smartwatch with gorgeous screen and fancy graphics, go for one of the Android Wear or Apple watches. If you’re looking for something simple, practical, durable and has a long-ish battery life, the Pebble smartwatch is perfect for you. By now you should be able to get Pebble 2 and Pebble Time 2 which offers slightly thinner bezel and also heart rate monitor. The Pebble smartwatch offers most of the essentials features that you’d expect from a modern smartwatch minus the hefty price tag.
Minix Neo X5 Mini Android box review
After selling off my first and awful Mi Box Android TV, I bought another Android TV box as replacement. This time it’s a much more powerful (and expensive) Minix Neo X5 Mini. The X5 Mini is powered by a dual-core Cortex Rockchip A9 processor with 1GB of RAM and 8GB of space. The operating system is an outdated Android 4.1.1 'Ice Cream Sandwich'. Usually my built-in tech-savvy alarm would be triggered by the specs but I was duped by the low price point (RM300) and nice user interface that I saw during the demo and review.
The X5 Mini is a significant upgrade over my last Mi Box. For once it comes with a friendly user-interface and welcome screen and they are fully in English. The second and most important thing is the pre-installed with Google Play Store (unlike the Mi Box). So I could theoretically install just about any apps from the Play Store. Setup and installation was simple and straightforward enough. Just plug in the power, HDMI cable and connect to the Internet and I’m all set. On one side you have two full-sized USB 2.0 ports and one SD card port. On the other side you have one full-sized HDMI port, optical audio and Ethernet port. The X5 Mini is about the same size as an Apple TV so it’s quite small easy to hide under or behind your television or living room furniture.
Although the X5 Mini comes with a remote, it’s function is pretty basic. You get to move between icons, turn on the unit from standby and control the volume. There’s no typing using the remote and most of the running apps as far as I remember testing doesn’t respond to the remote. To make matter worse, there’s no remote control app that you could install on your smartphone for the purpose either.
As much as I want to update to the latest Android version, say KitKat or later, I could only go as far as 4.2.2 which is pretty old by today’s standard. Unsurprisingly, I couldn’t install some of the newer apps that requires newer Android OS versions. Some apps like iFlix and Astro On The Go wouldn’t install at all on the Android Box. When asked, their official Twitter account said Android TVs are not officially supported at the moment which sucks big time because I’d like to stream a lot of shows from those to channels. I have no idea why they don't officially support Android boxes since they use practically the same OS.
But it’s not all doom and gloom with the X5 Mini. This Android Box could still play videos and movies effortlessly from an external hard drive. I could never get it to stream from a network folder though as much as I tried. Streaming from Popcorn Time works although it usually takes a while for the movie to load. Other than that, I can’t think of any more nice things to say about the X5 Mini. You would think that an Android box would be somehow compatible or play nice with Chromecast but you’d be disappointed. It does not connect or works at all and I’ve tried nearly a dozen 3rd party apps.
In a nutshell, the Minix Neo X5 Mini Android TV box is a slight improvement over the Mi Box Android box. Outdated would best describe it. It’s hardware and OS is outdated and the network connection could feel sluggish at times. Therefore it is no surprise that I parted ways with this Android box less than 3 weeks after purchase. The minimum requirement for a decent set-top box is to stream or mirror stuff from my smartphone and to support many popular streaming apps like Astro on the go or iFlix. The X5 Mini didn’t meet any of that hence why I need to let it go and ultimately bought an Apple TV. My advice if you’re looking for an Android box, look for one with at least 2GB of RAM and a newer Android OS installed. Most of these Android boxes are not upgradeable and you’re likely to be stuck with the pre-installed OS.
If you only need to stream or mirror content from your smartphone or computer, an Apple TV or Google’s Chromecast would be a better solution than a full-fledged Android box. A lot of people bought an Android box to have it installed with a pirate satellite streaming service and usually you need to get somebody (usually the service provider) to configure and setup the Android box unit for you. They don’t come pre-installed in any Android box in the market out there and it’s complicated enough process even for a tech-savvy person like me to figure out. My advice, get a specific Android box model or better still, buy one from them altogether (and don’t ask me where to get one).
How to catch Pokemons like a pro with PokeBot Ninja
As you have already known, the location-based augmented reality mobile game Pokemon Go has taken the world by storm. Pokemon Go is released gradually to select countries around the world, starting with Australia, New Zealand and the United States. This is followed by Europe, central and south America, Japan and finally most of south east Asia. However due to the game’s tremendous popularity, people have been trying to play the game even before their official release. Pokemon Go is a location-based game and it uses a mobile device’s GPS capability to capture Pokemons. So how does one play Pokemon Go when the game is not officially available in their country? GPS spoofing of course.
There are a few ways to allow you to play Pokemon Go virtually anywhere in the world. Some uses a GPS spoofing hack on their mobile phone, others use a bot program which harvest Pokestops and catch Pokemons automatically from their computer. The former is more labour-intensive yet fun but the latter is a lot more productive. So here I’m going to teach you how to catch Pokemons in Pokemon Go like a pro without leaving your desk using PokeBot Ninja.
First of all you (obviously) need to have either a Google or Pokemon Trainer Club account created from the Pokemon Go game. Then you need to download the PokeBot Ninja program from the creator’s website. The program is written using the Java programming language so you need to have Java or Java Runtime Environment (JRE) installed on your computer. The good thing about Java is it’s cross-platform meaning you can play it on Windows, Mac or even Linux as long as you have JRE installed. If you don’t already have Java installed, download and install it from this website.
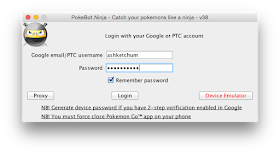
Once you’re done installing Java, you can now download PokeBot Ninja from the creator’s website. The guy spend countless days and energy programming the hack so if you can afford it, give him a few dollars as a token of your appreciation. In the PokeBot Ninja folder that you just downloaded, you will usually find two files, namely PokeBotNinja.jar and ninja.json. Double click the jar file and you will see this login screen. If something else appears instead or nothing happens, you probably still don't have Java installed on your computer.
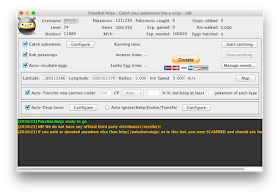
You can either login with your Google Account or Pokemon Trainers Club credentials. Once you’re in, you will be presented with this interface.
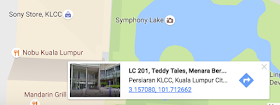
Before you go botting for Pokemons, you will have to decide where you want to do the catching. This is because you need to enter the exact coordinates - latitude and longitude into the program. To do this you will need to open the location on Google Maps. For example I want to catch Pokemons at KLCC Park so I just search for "KLCC Park" in Google Maps.
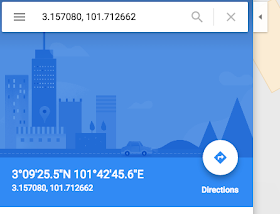
Now that I have the general location of the park, I will need the exact coordinates. To get that I have to right click somewhere in the middle of the map and click What’s here. This will show you the coordinates of the location and you just click on the longitude and latitude down there.
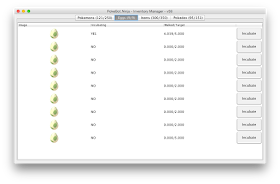
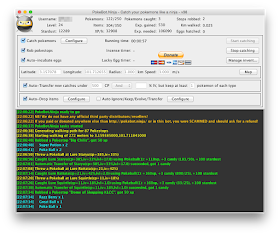
Next on the PokeBot Ninja program, enter the exact longitude and latitude you looked for previously in their respective boxes. Other options you can select is whether you want to catch Pokemons, rob Pokestops and auto-incubate eggs. I will usually leave the walking speed as it is (3m/s) because that’s normally how fast humans walk. You can also set the program to auto-transfer Pokemons under certain CP or IV percentage to the professor for candies. After you have set all your preferred settings, it's time to let the program do all the hard work for you. Click the Start catching button and watch the status box where the bot will do all the catching and robbing for you effortlessly before your very eyes. Before you click the Start catching button though, remember to sign out or at least force close the Pokemon Go app on your smartphone so that you don’t have 2 instance of the game running at once. That might break the game or worse get you banned. Every Pokemon, Pokeballs, potions and other items that the bot catches will by synced with the mobile game on your phone.
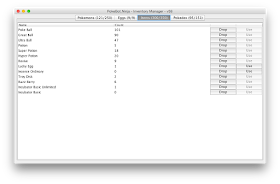
After you’ve done a few hours of botting, you will soon find your inventory full. There’s a limit of how many Pokeballs, potions and other stuff that you can keep at any one time which is 350 items. You can control how many Pokeballs and items you want to keep or drop and whether you want to evolve or transfer Pokemons with the Manage inventory screen. Usually I will clear out a few dozen Pokeballs and potions to make room in my inventory for the next botting session.
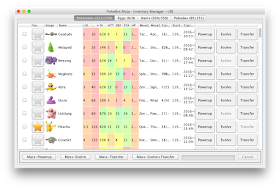
Likewise you can evolve, transfer or power up your Pokemons from within the program.
As you can see, PokeBot Ninja is an easy but powerful program to catch Pokemons without leaving your home. However since this program violates the game’s terms and conditions and is generally considered cheating, there’s a good chance your account might get banned by the game’s developer, Niantic if you are not careful with your setting and locations. Here’s a few tips on how to use PokeBot Ninja successfully without getting banned or at least not so quickly.
1. Always-always remember to sign out of force close the game on your mobile phone. Running two instances of the game at once will raise suspicion of cheating from Niantic.
2. Bot like a normal human being does, do not teleport. If you have just finished botting in Kuala Lumpur for example, do not immediately enter another coordinates a thousand miles away like Sydney or Tokyo. Wait a few hours or even days before you start botting in another country or far away locations. I usually wait at least half an hour before moving across different zip codes so not to raise suspicion.
3. Avoid botting for long hours on end because no normal human being does that. I usually keep my botting session 3 consecutive hours max and not more than 6–7 hours per day.
4. Set the walking speed no faster than 3 meters per second.
5. Keep tabs on the number of Pokemon caught and Pokestops robbed per day as not to raise suspicion. I usually keep my Pokemon catch below 500 and Pokestops robbed below 1000 per 24 hours just to keep it safe.
6. You will be tempted to fight at a gym. Do so at your own risk especially if you are Level 20 and above. Some trainers might be suspicious and snitch on you to Niantic to get you banned. Although the likelihood of that happening is slim it is still a possibility. Once Niantic started scrutinising your game log they might get suspicious and end up banning you. Of course you can do the same and report the opposite trainer but there’s always a chance he or she got to their level the legit way. It’s all up to luck.
7. If you are botting overseas, make sure the country that you're going do actually have Pokemon Go released there. I attempted doing a Pokemon Go world tour by visiting one Asian country after another but forgot that China doesn't have the game released there and also Google Maps is totally blocked in the country. Furthermore from my short experience of botting overseas, they usually stop working after the first few minutes so I won't bother anymore from then on.
8. As you can see, much of the tips above are just common sense. Give no reason for Niantic to suspect that your account is botting. Set your settings and sessions as human-like as possible. Avoid teleporting and botting too many hours between sessions. If Niantic suddenly detects something shady going on with your Pokemon Go account they might softban you first before giving out a permanent ban. If you are softbanned, you may not be able to find any Pokemons anywhere or when you rob a Pokestop, you won’t get any Pokeballs or potions. This softban might last a few hours max. A permanent ban is where they send you an email saying you have violated the game’s terms and your account have been terminated. If you missed the email but you suddenly find yourself locked out of your Pokemon Go account then you can be sure that you have been banned permanently.
Is this cheating? Absolutely. But let’s face it, not everybody has the luxury to visit crowded malls and parks all the time. In fact I used to do exactly that before I found out about PokeBot Ninja. I also used to open Pokemon Go app and look for Pokemons and Pokestops while driving (albeit slowly) which is clearly dangerous to say the least. Now I can catch Pokemons from the comfort of my living room. I have gone from Level 1 to Level 24 in less than a week. Sure there’s no telling when Niantic will find a way to block such hack or program as they did with previous hacking programs. But as of now, it’s still working flawlessly and the programmer had outed the 38th version of the game, each with better improvement. Pokemon Go is surely a fun and addictive game to play and you can double the fun with a program like PokeBot Ninja. Just take the necessary precautions and you’ll be levelling up and catching/hatching those rare Pokemons in no time.
Coming soon in my next post - the top 20 locations with the most Pokemons and Pokestops in the Klang Valley.
Update:
As of today, 27th September 2016 PokeBot Ninja no longer works after the latest Pokemon Go update. I'm sure the developer is working hard to crack the game again but until then... :(