 Bonne chance dans tout ce que vous faites. Etudiez dur et ne pas aller datant seulement avec les garçons à l'école. Revenez bientôt allez-vous? Merci pour tout et pardonne-moi si j'ai fait quelque chose de mal.
Au revoir mon ami
Bonne chance dans tout ce que vous faites. Etudiez dur et ne pas aller datant seulement avec les garçons à l'école. Revenez bientôt allez-vous? Merci pour tout et pardonne-moi si j'ai fait quelque chose de mal.
Astro - everybody got one
Ever since I wrote about that free decoder from Astro post last month, everybody in my department started subscribing to Astro, not just at home but also at work too.
 Like my colleague Fiza got one.
 Abang Din also got one at his desk.
 Bujal said the Asto dish dramatically improves his WiFi reception.
 En Mazlan (not his real name) didn't want to miss his favourite Tamil movies during lunch so he got one himself.
 En. Jeff watching Astro Vaanavil on his laptop. Our friend Feti is a little bit shy today because she got pimple on her forehead.
 En. Radzi (also not his real name) got one for himself and his deputy.
 I say man, even Sapuang got one installed on his kapchai. How to watch Astro on a bike? Using the side mirror?
Asus EEE PC 4G Review
I don't know how they did it but a few weeks ago CIMB bank gave me a credit card with my name on it. And then the next day I went to Low Yat Plaza and bought myself my first very own notebook, the Asus EEE PC 4G. Weird stuff.
 The Asus EEE PC notebook family comes in 4 models, the 2G, 4G, 8G and 900. I've searched Low Yat Plaza high and low that day and I came to the conclusion that only the 4G unit is available in this country. The basic 4G unit costs just RM1299.
 This subnotebook came with a notebook sleeve, charger and an installation DVD, that's all. For RM1299 I get a 7" screen, 900Mhz Intel M processor, 512MB DDR2 RAM, 4GB solid state hard disk, 0.3 megapixel webcam and wireless LAN.
 It also has 3 USB ports, one SD card slot, one VGA port, Kensington lock port, VGA port, Ethernet port and no CD-ROM. 4GB hard disk space is definately too small to store anything so I bought a 8GB SD card and an external DVD-writer for RM90 and RM317 each.
 The Asus EEE PC has only one memory slot so I decided to upgrade the RAM to 2GB for RM110 on the spot. Overall I spent RM1816 for the notebook plus accessories. I know I can get a decent Acer notebook for that price but then it's going to be HUGE and heavy and everybody knows Acer sucks. The reason I chose the EEE PC over others is the size, weight and mobility. Other subnotebook with this size should easily cost between RM3000 (a Dell) to RM8000 (Sony VAIO).
 I was tempted to buy the pearl white colour but I thought with my line of work, it'll get all sumdgy and dirty within weeks. Design-wise I think the EEE PC is quite okay. I wish the would put the speakers elsewhere instead of flanking the screen like that. The plastic casing felt rather cheap too and the touchpad key makes quite a noise when clicked.
 The 4 cell Lithium-Ion battery can last over 3 hours when left idle, around 1.5 hours when watching a full length movie from a thumbdrive and only 45 minutes when using the external DVD drive. I think you can purchase the optional longer lasting battery pack somewhere according to their website.
 The default operating system for the EEE PC is Xandros Linux, a propretiery Linux system that is not too popular among the open-source community. Anyway this notebook is fully compatible with Windows XP but with only 4GB of disk space, you'll have to install most of your application into a SD card or an external hard drive. I've successfully installed Windows XP on this notebook before attempting to install Mac OS X Leapord and finally Ubuntu 8.04. I aborted the Mac OS installation halfway cause it takes too much time. Besides, I think Mac OS X will literally crawl on this machine with its low-low specs.
 The icon-based Xandros Linux is quite okay (for a 4 year old) but for serious users like me, I'd prefer to use a real OS like Ubuntu. Actually installing and using Windows XP is a lot easier than Ubuntu because all the drivers is provided inside the installation DVD and all the hardwares (wireless, webcam, sound) worked without any problem. Using Ubuntu on the other hand, presents me with a couple of problems. First the wireless and microphone jack didn't work and then I just cannot shutdown my notebook properly.
 Fortunately I got them all fixed thanks to the EEE PC fixes page found at this Ubuntu Community page. The solutions is not that hard if you just follow the instructions properly. Yes it's quite challenging downloading, compiling and installing the drivers all by yourself but I get an enormous sense of satisfaction when I get them all working in the end. After installing Ubuntu, OpenOffice.org, Thunderbird, Audacious, Audacity and VLC media player I got about 900MB of disk space left. Despite clocking only 900MHz, running applications, music and videos felt really light partly thanks to Ubuntu but mostly because of the 2GB DDR2 RAM.
 Except for the super-small 4GB hard drive, I must say I'm quite satisfied with the Asus EEE PC. Listed here are some pros and cons of the notebook.
Pros: Lightweight, compact, affordable.
Cons: Small screen, short battery life, cheap plastic, limited disk space.
Obviously the EEE PC is not a notebook for everyone. If you're looking for an affordable entry-level notebook for common tasks such as typing documents, spreadsheets, surfing the Internet, blogging or stuff then the EEE PC is right for you. Of course you can also watch movies, listen to music and burn DVDs using an external DVD drive or hard drive. Then again some people will find the 7" screen and the 800x420 resolution to be too small or the keyboard too little for their huge fingers. It all depends and you really and what you plan to do with the notebook. As for me I'm quite happy with my little baby here :)
Asus has realeased the EEE PC 900 model in Europe, North America and some partd of Asia (but not yet in Malaysia). This model has up to 20GB of SSD+flash hard disk and it comes bundled with 8.9" screen and Windows XP. So if you're thinking of getting yourself an EEE PC anytime soon, I suggest you hold on for this model.
We're moving to Petropavlovsk-Kamchatsky
I can't take it anymore. This sweltering heat. That's it, next month we're moving to Petropavlovsk-Kamchatsky city.
 Located on the far-eastern part of Russia, Petropavlovsk-Kamchatsky has an average temperature of -7.3 °C in winter and 20 °C in summer. The climate there is subarctic and precipitation averages at 860 millimeters, most falling as snow (yay!). The city is situated on high hills and surrounded by breathtaking volcanoes (there are 160 volcanoes here with 29 still active). The population here is just around 198028 people only so there's plenty of room for everyone. I bet the rent there is dirt cheap too.
 Petropavlovsk-Kamchatsky is best known for the abundance and size of its brown bears, arctic wolves, foxes, lynxes, wolverines,weasels, river otters, reindeer, moose, marmots, lemmings and several species of squirrel. Sounds a lot but hey I can live with that (as long as they're not dogs or cats). The region also house 6 different salmon species (yummy!) and during weekends I can take my family to the seaside to watch the whales, dolphins and sea lions at play.
 The only downside is, no roads connect the Kamchatka Peninsula to the rest of the world so if you'd like to pay us a visit you'll have to catch a flight to the Petropavlovsk-Kamchatsky municipal airport. And oh yeah, my new address will be at 24 Leningradskaya Street, Petropavlovsk-Kamchatsky, Mother Russia.
決してブログについて仕事
はい、決して。特にあなたの上司が起こるときにあなたのブログを読む毎日です。今日の私は私の上司から、ヘアドライヤーの治療については何か、それについて書くブログです。私はずっと前から不満のある企業が、この S ていたポルノをダウンロードする1つの従業員は自分のコンピュータですか?彼は私を読み取りについては、この従業員のインターネット接続を切断します。知っているような私の上司が最終更新時刻を確認君は自分の上司とその会社を所有していない場合ですか?何が本当の会社の上司の言うことは参考にすればよいですか?
ブログについては昨日、今朝会社OをKLと彼は私を削除するに開示する部分についてはどこに過ちです。後に彼は私を自分の事務所を修正すると呼ばれる何かについて自分のノートパソコンと入力し、彼は私に長時間の講義については、危険のブログです。彼はまた私についてのトピックに触れ銀行バッシングが私の最後のエントリです。しかし、率直に私の上司の懸念を理解して、何を書いたのは本当に本当に軽度の周りに比べてどのような他のインターネットは既に書いた。だから私は考えるの最後の人々に、当局でトラブルに巻き込まれる。それに、私はできないと思います何も悪いことを除いて真実を書いた。
にもかかわらず、今すぐに私はもう仕事はブログについては、特に、肉汁たっぷりの物語です。私の上司は私の文章を奨励し、推進によると彼は私をここで、私はすべてのチャンスを撮影します。ため息をつく。
Precedente bancario
Érase una vez, hubo un CIMB (antes conocido como BCB) sucursal en zona tranquila de edad Seri Serdang. La sucursal se encuentra a lo largo de una fila de casas de tienda que es de fácil acceso y hay un amplio espacio de aparcamiento para sus clientes.
 Luego, de repente, BAM! Cerraron la sucursal Seri Serdang y decidió abrir otro a lo largo de la carretera principal del pueblo Seri Kembangan. Al parecer, los Seris Serdang rama era demasiado conveniente para sus clientes de manera que haya decidido hacer la vida difícil para todos y pasar a la rama animada Seri Kembangan. Esto en cuanto a su lema Adelante Bancaria. ¿Qué se les pensamiento? La persona cuya responsable de trasladar la sucursal a CIMB Seri Kembangan ciudad es un idiota!
 A partir de entonces, los clientes tienen ahora a una doble o triple parque aparcar sus coches a lo largo de la carretera principal ocupado para hacer su banca en esta rama fricking. Sí puede estacionar en el lugar de estacionamiento designados (tres de ellos) pero tendrá que entrar allí a las 6 de la mañana. Hable acerca de la falta de previsión. Seri Kembangan ciudad no es el lugar adecuado para abrir un banco. Heck, Seri Kembangan no es el lugar adecuado para crear cualquier tipo de negocio u oficinas en absoluto. El camino es estrecho y perpetuamente congestionada y todo el mundo en esta ciudad tienen esta noble hábito de estacionamiento en cualquier lugar que deseen. Y el hecho de que las autoridades nunca tomar ninguna acción no ayuda tampoco.

Top 5 online file sharing services
(From Lifehacker)
Whether you're trying to share megabytes worth of music with a friend or send an important document to a coworker, nothing outshines a fast, easy-to-use file-sharing service. Here we've rounded up the five most popular file sharing services.
MediaFire
 Users love unlimited storage, and MediaFire offers just that. The service is free, offers unlimited disk space, and requires no sign-up to use any of the site's features. The files you upload, however, can only be up to 100MB in size.
(My favorite, I like!)
Windows Live SkyDrive
 With an impressive 5GB of free storage space, Windows Live SkyDrive is one new product out of Redmond that's quickly found a place in users' hearts. SkyDrive works on a folder-based system, emphasizing the ability to organize your files in personal, shared, and public folders. SkyDrive requires a Windows Live account to get started, individual uploads are limited to 50MB.
(This service is not available outside North America, Damn)
FolderShare
 The cross-platform FolderShare is more of a file syncing tool than it is a traditional file-sharing service. (In fact, it's what we used to sync Firefox extensions across the internet.) FolderShare lovers emphasize the ease with which they can share a folder on their desktop, then quickly sync the folder's contents to a friend's computer. All you have to do is set it up, then any file you drag into a shared folder is automatically replicated on computers you're sharing folders with.
(Have to download and install a Microsoft software)
Box.net
 Popular for its simple interface and large feature set, file-sharing site Box.net provides 1GB of free space. Users love it for its collaboration tools and open format, which enables fun features like mounting you web space on your desktop and web service support, and RSS feeds. Like many other file sharing services, Box.net provides direct links to files so users aren't held up at a landing page to get their download. Box.net's biggest drawback is its free account's file size limit, which sits at a rather paltry 10MB.
(Space too small)
Drop.io
 Renown by users for its simplicity and impressive interface, Drop.io doesn't require registration for use and specializes in document sharing, offering built-in previews of everything from images to PDFs. The innovative service has recently added a couple of new features, like free sending and receiving of faxes and voice recording. The free account has a 100MB storage limit, so unless you're ready to spend some cash, Drop.io is best-suited for smaller files.
(This one is quite okay)
Ubuntu Studio Edition 8.04 installation
Ubuntu Studio Edition is a multimedia creation flavor of Ubuntu. It is aimed at the GNU/Linux audio, video and graphic enthusiast as well as professional. Ubuntu Studio Edition provides a suite of the best open-source applications available for multimedia creation.
This is a step by step guide on how to install Ubuntu Studio Edition 8.04 on an Intel i386 PC, dual boot with Windows XP. This tutorial is also applicable for Ubuntu & Kubuntu 8.04.
Minimum PC specs for Ubuntu Studio Edition installation: Intel Pentium III 800Mhz and above, 512MB RAM, DVD-Rom drive.
First download and burn the Ubuntu Studio Edition DVD image (iso file) from here. For Ubuntu 8.04 Hardy Heron installation, get the alternate CD image.
Tip: If you have an empty hard drive, install Windows first before installing Ubuntu. During the Windows installation, reserve at least one sizable partition (at least 5GB) for your Ubuntu partition and another small partition (at least 500MB) for the swap area.
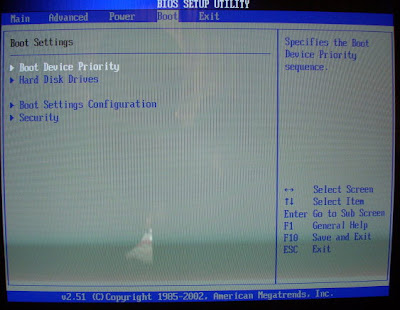 Next you need to configure your PC to boot from the DVD drive.
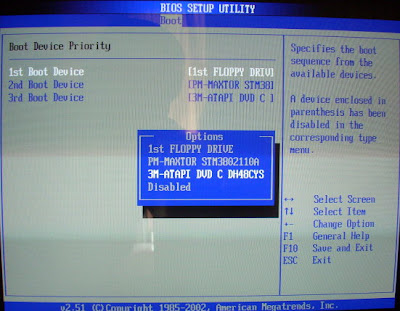 Enter the BIOS Setup on your PC and set the DVD drive as the 1st boot device.
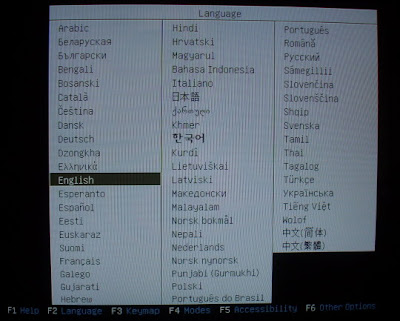 Your PC will now boot from the DVD drive. Choose a language.
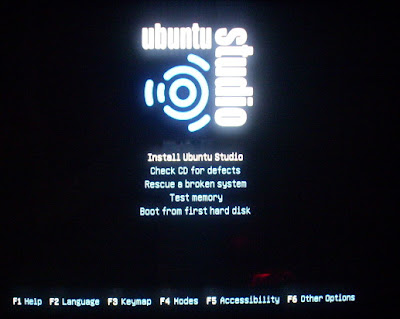 Now you may select Install Ubuntu Studio or you may want to Check the CD for defects first. Defective CDs will affect your installation process.
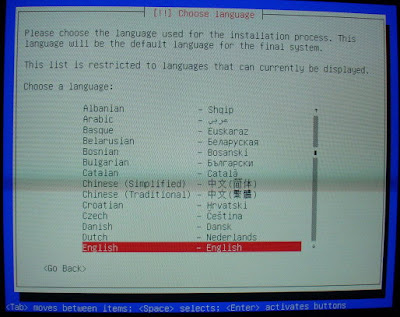 Next choose a suitable installation language.
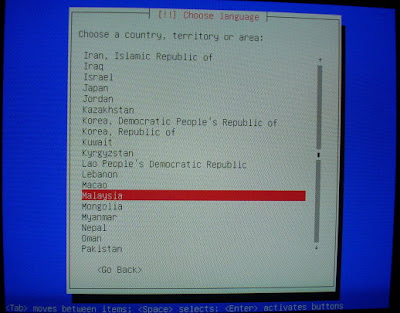 Then choose the country you are currently residing. This will affect the system's time zone.
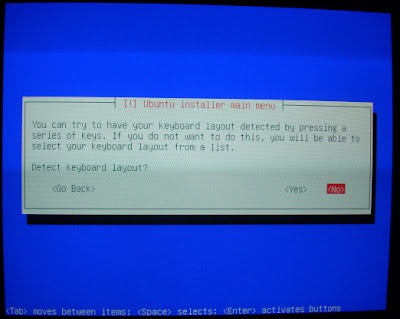 The installer will ask whether you want to detect the keyboard layout.
 Normally I don't want Ubuntu to detect the keyboard for me because this process will take an unnecessarily long time. Besides, most of the keyboards in my country uses the USA layout.
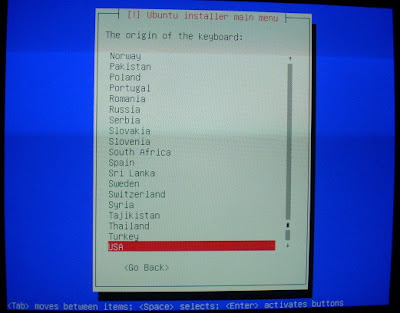
 Since I already knew my keyboard uses the USA layout, I just choose the appropriate country.
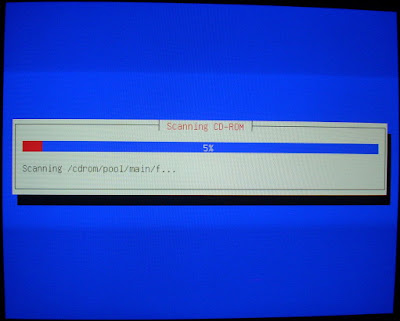 Wait for a moment while the installer scans the cd...
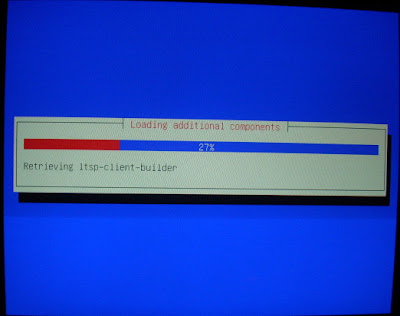 ... and initialize the installation process.
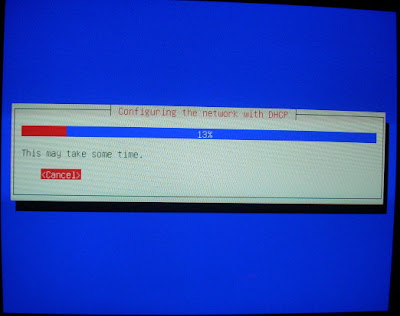 The installer will now attempt to automatically configure your network setting. Usually I would skip this process by selecting Cancel.
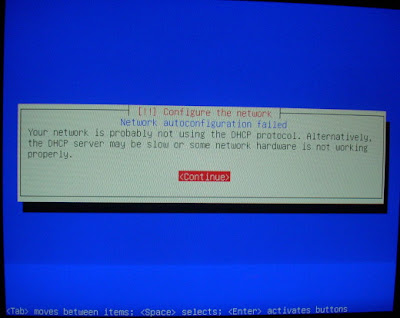 This is because if you're PC is connected to the Internet, the installer will attempt to download the latest update from various Ubuntu repositories which could take hours to finish.
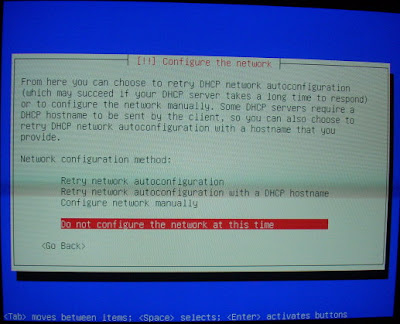 Even if you're not connected to the Internet, the installer will attempt to download updates from the Ubuntu servers anyway when your network is configured. Therefore I recommend you unplug the network cable and choose Do not configure the network at this time. You can easily reconfigure your network setting later on.
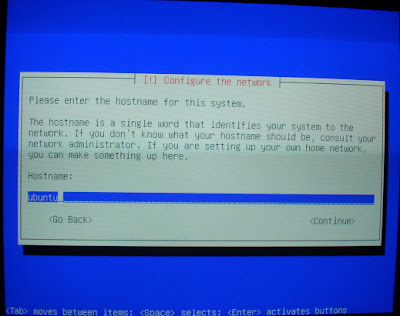 Enter a hostname for your Ubuntu system. This is similar to putting a name for your PC in Windows.
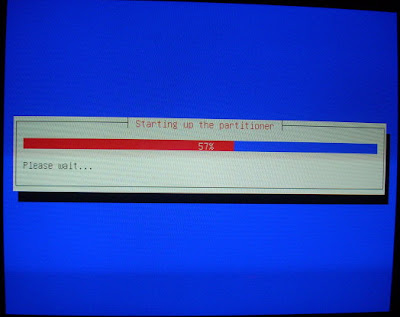 The installer will now start the partitioning process.
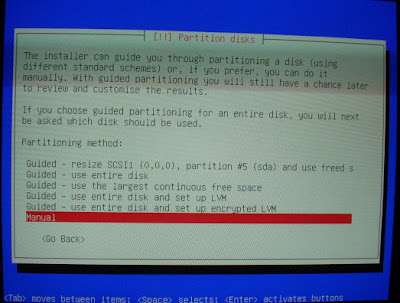 The partioner is a bit tricky for novice users but with the right guide, partioning your hard diks(s) should be a breeze. If you plan to use Ubuntu alone on your PC you might want to use the Guided method. Else if you already got Windows installed on your PC, use the Manual method.
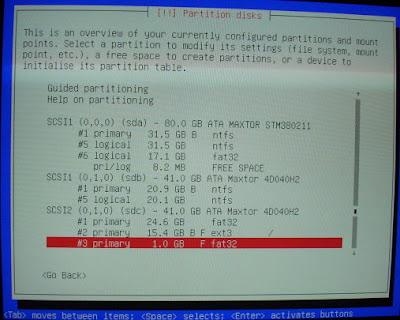
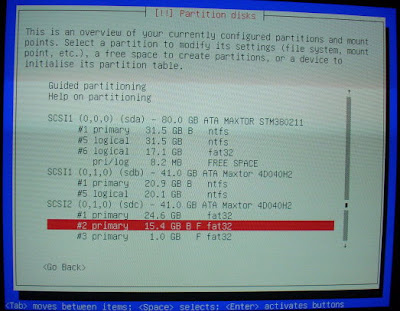 As for me, I have 3 hard disks installed on my PC with 8 seperate partitions. Like I said earlier, you should reserve a partition during Windows installation or you can install Ubuntu on a second hard disk altogether. In this example, I choose the 2nd partition on my 3rd hard disk (15.4G in size) as my Ubuntu partition. The 3rd partition will be used as the swap area. With the 15.4G partition selected, press enter. Be careful not to select your Windows directory partition.
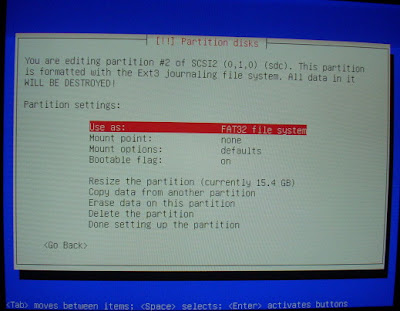 This partition is currently formatted as FAT32 and you have to change it to a Linux file system before you can install Ubuntu on it. Select Use as: and press enter.
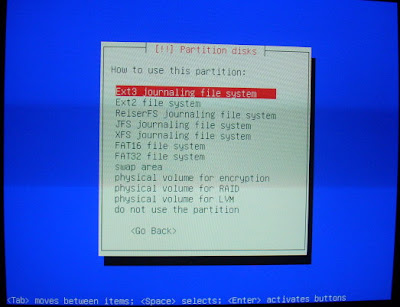 Ubuntu supports several Linux file systems but the most common types are Ext3 and Ext2. I would normally choose Ext3 as my Linux file system. Select a file system and press enter.
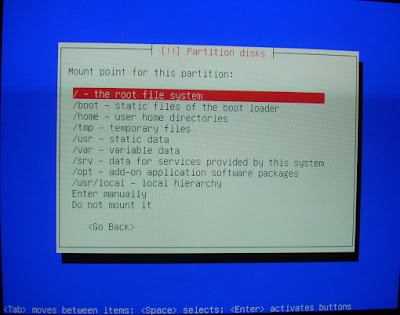 Next the installer will ask you to set the mount point for this system. The mount point is where the directory where the systems mounts all your hard disk partitions. Choose the root file system and press enter.
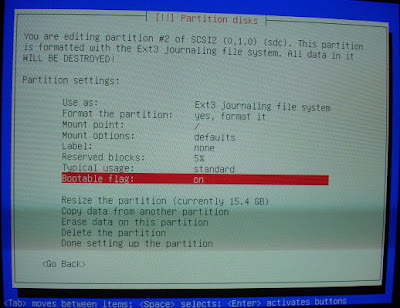 Still on the Ubuntu partition, remember to set the Bootable flag as on.
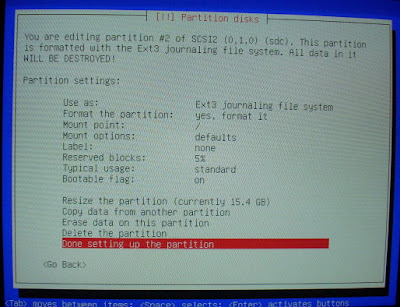 Finally you're finished with setting up the Ubuntu partition. Now you will have to create the swap partition for your Linux system.
 Here I use the 3rd partition on my 3rd hard disk (1GB in size) as the swap area. Swap is basically the same as Virtual Memory in Windows but instead of paging files to the hard disk during operation, Linux systems like Ubuntu will use a dedicated partition (swap area) as Virtual Memory. It is possible not to use the swap area in Linux especially if your RAM capacity is huge (1G and above) but it is highly recommended that you create one anyway. This is because when somehow your system ran out of memory and you don't have a swap area, your Linux system might just crash. With the 1GB partiton selected, press enter.
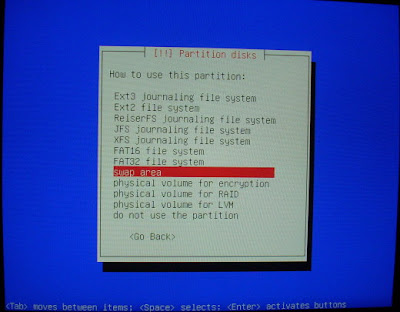 Choose use this partition as swap area. As a rule of thumb, your swap area should be at least twice the size of your physical memory (RAM size) but not more than 1G. Anything larger than that will slow down your system instead.
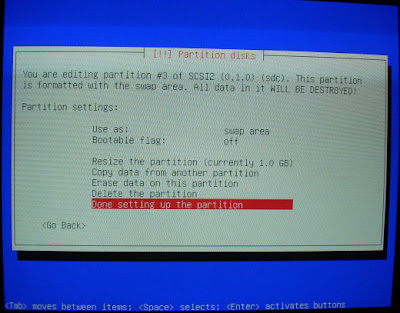 Now your finished setting up the swap area. No need to change the bootable flag (leave it as off).
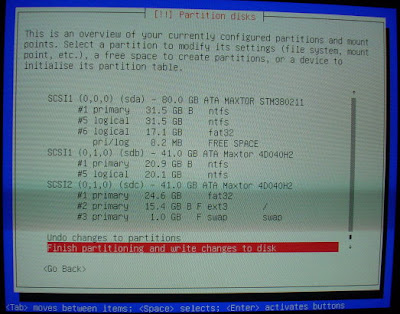 To finalize setting up all your Linux partitons (Ext3 and swap area) choose Finish partitioning and write changes to disk.
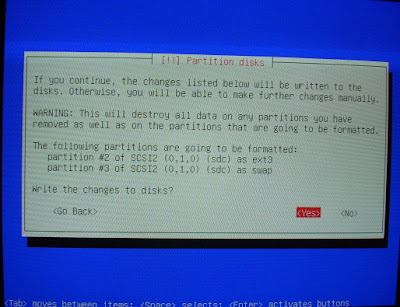 At the confirmation page, select Yes to write the changes to disks.
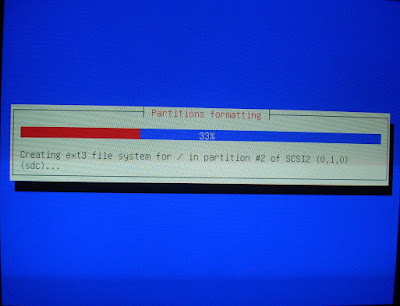 The installer will now format your Linux partitions (root and swap area) to their respective file systems. The important point here is you must format one partition to Ext3 format and another partition as a swap area. Remember to set the mount point to root (/) and set the bootable flag to On.
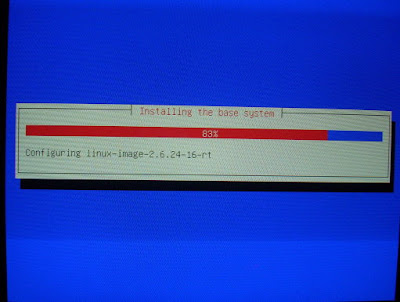 Ubuntu will now install the base system on your hard disk. This will take some time.
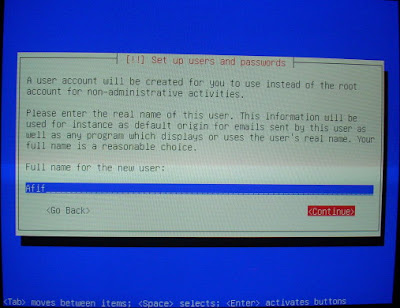 After that enter your real name. This information will be use as default name in your e-mail or office applications.
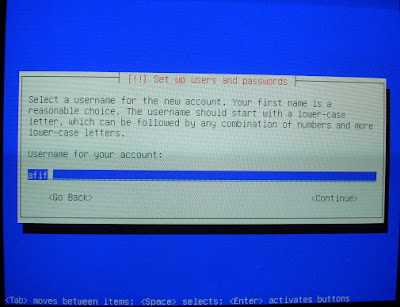 Now enter a username for your account.
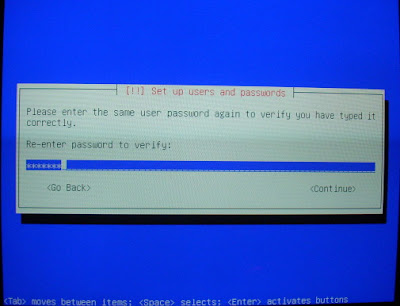 And enter the password twice.
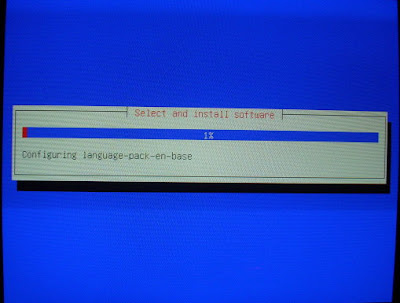 The installer will then install all the default software for your Ubuntu system. You can always add or remove any software later on using the Synaptic Package Manager.
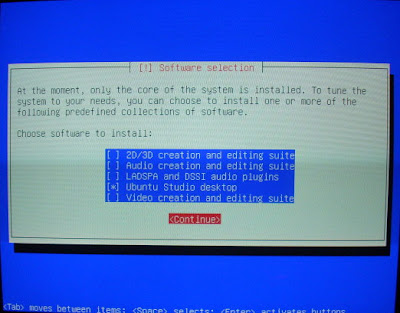 For Ubuntu Studio Edition, you can choose from a predefined collections of software from graphical editing suite to audio-video creation suite. Press the Tab key to move between items and press Space to select a particular suite. In the example above, I only select the basic Ubuntu Studio desktop suite because I have no need for the other suites. This menu is the only difference between Ubuntu Studio Edition and the other regular Ubuntu edition installation.
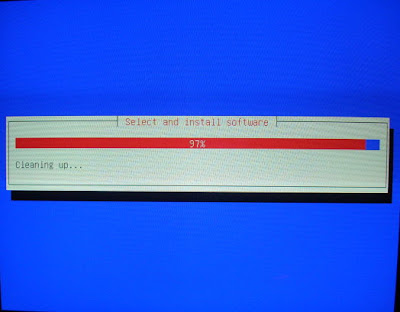 The installer will then resume all the remaining software installation.
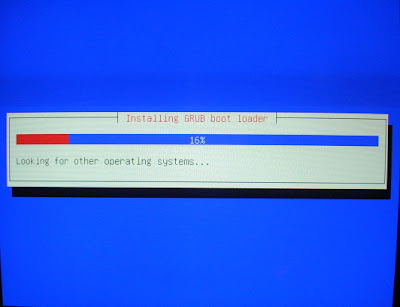 Next the installer will look for other operating systems (i.e Windows) before installing the GRUB (GRand Unified Bootloader).
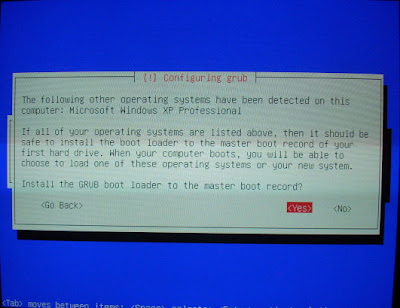 The GRUB boot loader will detect any other operating system in your hard drive and list them in the boot loader screen when you boot up your PC. This way you can choose whether to boot into Ubuntu or Windows during start up.
 The GRUB boot loader will be installed to the master boot record.
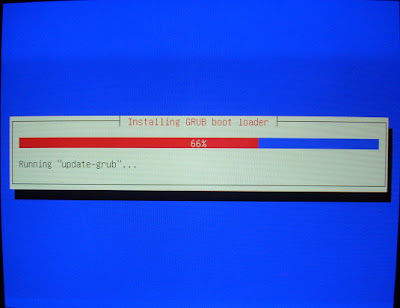
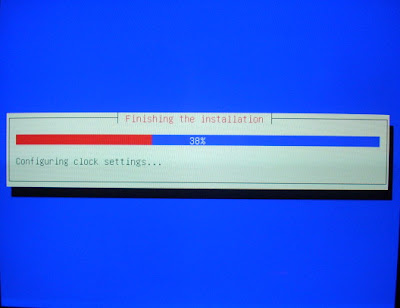 Wait for a moment while Ubuntu finishes the installation process.
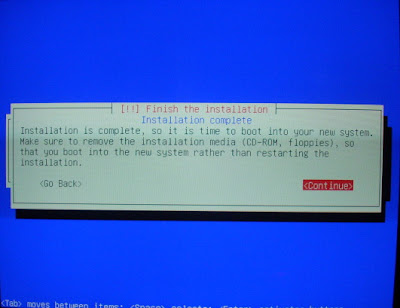 Installation is now complete (yay!). Remove the DVD-Rom from the drive and select Continue to restart.
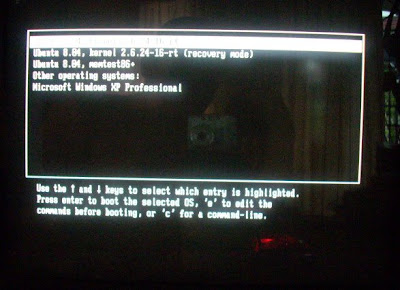 This is the GRUB boot loader screen that I mentioned before. Choose to boot into Ubuntu or Windows.
 The Ubuntu Studio Edition start up screen.
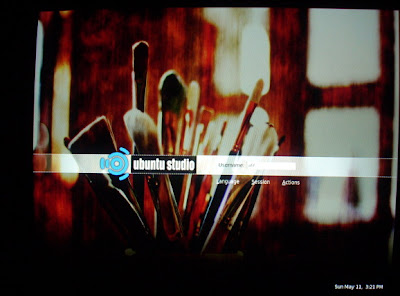 Ubuntu Studio Edition login screen.
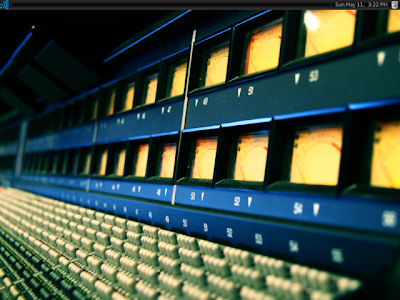 Ubuntu Studio Edition desktop screenshot. Just one panel for the 8.04 version. Unlike regular Ubuntu editions, Ubuntu Studio Edition uses a black and blue theme.
This is a step by step guide on how to install Ubuntu Studio Edition 8.04 on an Intel i386 PC, dual boot with Windows XP. This tutorial is also applicable for Ubuntu & Kubuntu 8.04.
Minimum PC specs for Ubuntu Studio Edition installation: Intel Pentium III 800Mhz and above, 512MB RAM, DVD-Rom drive.
First download and burn the Ubuntu Studio Edition DVD image (iso file) from here. For Ubuntu 8.04 Hardy Heron installation, get the alternate CD image.
Tip: If you have an empty hard drive, install Windows first before installing Ubuntu. During the Windows installation, reserve at least one sizable partition (at least 5GB) for your Ubuntu partition and another small partition (at least 500MB) for the swap area.
 Next you need to configure your PC to boot from the DVD drive.
 Enter the BIOS Setup on your PC and set the DVD drive as the 1st boot device.
 Your PC will now boot from the DVD drive. Choose a language.
 Now you may select Install Ubuntu Studio or you may want to Check the CD for defects first. Defective CDs will affect your installation process.
 Next choose a suitable installation language.
 Then choose the country you are currently residing. This will affect the system's time zone.
 The installer will ask whether you want to detect the keyboard layout.
 Normally I don't want Ubuntu to detect the keyboard for me because this process will take an unnecessarily long time. Besides, most of the keyboards in my country uses the USA layout.
 Since I already knew my keyboard uses the USA layout, I just choose the appropriate country.
 Wait for a moment while the installer scans the cd...
 ... and initialize the installation process.
 The installer will now attempt to automatically configure your network setting. Usually I would skip this process by selecting Cancel.
 This is because if you're PC is connected to the Internet, the installer will attempt to download the latest update from various Ubuntu repositories which could take hours to finish.
 Even if you're not connected to the Internet, the installer will attempt to download updates from the Ubuntu servers anyway when your network is configured. Therefore I recommend you unplug the network cable and choose Do not configure the network at this time. You can easily reconfigure your network setting later on.
 Enter a hostname for your Ubuntu system. This is similar to putting a name for your PC in Windows.
 The installer will now start the partitioning process.
 The partioner is a bit tricky for novice users but with the right guide, partioning your hard diks(s) should be a breeze. If you plan to use Ubuntu alone on your PC you might want to use the Guided method. Else if you already got Windows installed on your PC, use the Manual method.
 As for me, I have 3 hard disks installed on my PC with 8 seperate partitions. Like I said earlier, you should reserve a partition during Windows installation or you can install Ubuntu on a second hard disk altogether. In this example, I choose the 2nd partition on my 3rd hard disk (15.4G in size) as my Ubuntu partition. The 3rd partition will be used as the swap area. With the 15.4G partition selected, press enter. Be careful not to select your Windows directory partition.
 This partition is currently formatted as FAT32 and you have to change it to a Linux file system before you can install Ubuntu on it. Select Use as: and press enter.
 Ubuntu supports several Linux file systems but the most common types are Ext3 and Ext2. I would normally choose Ext3 as my Linux file system. Select a file system and press enter.
 Next the installer will ask you to set the mount point for this system. The mount point is where the directory where the systems mounts all your hard disk partitions. Choose the root file system and press enter.
 Still on the Ubuntu partition, remember to set the Bootable flag as on.
 Finally you're finished with setting up the Ubuntu partition. Now you will have to create the swap partition for your Linux system.
 Here I use the 3rd partition on my 3rd hard disk (1GB in size) as the swap area. Swap is basically the same as Virtual Memory in Windows but instead of paging files to the hard disk during operation, Linux systems like Ubuntu will use a dedicated partition (swap area) as Virtual Memory. It is possible not to use the swap area in Linux especially if your RAM capacity is huge (1G and above) but it is highly recommended that you create one anyway. This is because when somehow your system ran out of memory and you don't have a swap area, your Linux system might just crash. With the 1GB partiton selected, press enter.
 Choose use this partition as swap area. As a rule of thumb, your swap area should be at least twice the size of your physical memory (RAM size) but not more than 1G. Anything larger than that will slow down your system instead.
 Now your finished setting up the swap area. No need to change the bootable flag (leave it as off).
 To finalize setting up all your Linux partitons (Ext3 and swap area) choose Finish partitioning and write changes to disk.
 At the confirmation page, select Yes to write the changes to disks.
 The installer will now format your Linux partitions (root and swap area) to their respective file systems. The important point here is you must format one partition to Ext3 format and another partition as a swap area. Remember to set the mount point to root (/) and set the bootable flag to On.
 Ubuntu will now install the base system on your hard disk. This will take some time.
 After that enter your real name. This information will be use as default name in your e-mail or office applications.
 Now enter a username for your account.
 And enter the password twice.
 The installer will then install all the default software for your Ubuntu system. You can always add or remove any software later on using the Synaptic Package Manager.
 For Ubuntu Studio Edition, you can choose from a predefined collections of software from graphical editing suite to audio-video creation suite. Press the Tab key to move between items and press Space to select a particular suite. In the example above, I only select the basic Ubuntu Studio desktop suite because I have no need for the other suites. This menu is the only difference between Ubuntu Studio Edition and the other regular Ubuntu edition installation.
 The installer will then resume all the remaining software installation.
 Next the installer will look for other operating systems (i.e Windows) before installing the GRUB (GRand Unified Bootloader).
 The GRUB boot loader will detect any other operating system in your hard drive and list them in the boot loader screen when you boot up your PC. This way you can choose whether to boot into Ubuntu or Windows during start up.
 The GRUB boot loader will be installed to the master boot record.
 Wait for a moment while Ubuntu finishes the installation process.
 Installation is now complete (yay!). Remove the DVD-Rom from the drive and select Continue to restart.
 This is the GRUB boot loader screen that I mentioned before. Choose to boot into Ubuntu or Windows.
 The Ubuntu Studio Edition start up screen.
 Ubuntu Studio Edition login screen.
 Ubuntu Studio Edition desktop screenshot. Just one panel for the 8.04 version. Unlike regular Ubuntu editions, Ubuntu Studio Edition uses a black and blue theme.
Subscribe to:
Posts (Atom)